BTEC SPORT UNIT 22: Student Notes For Part B

Featured

What notes should students make in preparation for Part B of their assessment?

Part A of the Unit 22 assessment requires students to make notes on three businesses of a given genre within the Sport and Active Leisure industry. This genre is supplied by the exam board (Pearson) in the Part A documentation. Students have six hours in which to make the notes which they can use to complete Part B of the assessment, which is 3 hours in duration. The notes must be a maximum of 4 sides of A4 paper.

To assist my students in making their notes I created some suggestions of the type of information they should be looking for when they research their three SAL businesses. These suggestions mirror the content and structure of the assessment in Part B and I suggest that notes are taken under the four headings of Business Operations, Facilities, Products & Services and Demographics.

I recommend that my students use one side of A4 to write information about each of the three researched businesses. That leaves one side of A4 to make notes on how to approach completing each of the four tasks in Part B.

Task 1: Review of Business Information

Tips: *make sense of the info given* *use, ‘this means that’* * ask yourself the “So What” question and then answer it*

Include the following:

  • Type of business – sole trader?, partnership?, private limited company?, public limited company?, co-operative? Limited / Unlimited liability? (Meaning) Public? Voluntary?
  • Scope of business – local?, national?, international?, multi-national? (Explain what it means)
  • Size of business – micro (1-9), small (10-49), medium (50-249), large (250+)
  • Current provision – explain what the business is doing now. Stakeholders (internal / external). Staffing structure – roles & responsibilities. FT/PT/permanent/temporary. HR. Marketing activity. Costs – Financial info. Trends. Demographic (target market / audience)
  • Compare to rival business and researched businesses.

The Purpose

Tips: *identify & talk about the 7 purposes of a private SAL* PROFIT, break even, survive, grow, diversify, customer satisfaction, market leader.

Include the following:

  • Link business information to the purpose. Identify & give examples of growth, diversification, customer satisfaction, for example.
  • Compare to rival business and researched businesses

The Data

Tips: *don’t just repeat what is already given to you* *make sense of the data* *make some meaning out of the data* *apply the data* *________ this means that _________*

Include the following:

  • Simple calculations *If __________ then __________* *whereas if we look at  (rival business / researched business)*
  • Consider –  facilities, operating hours, equipment, age of business, staffing, premises, accommodation, financial data, transport, cost / pricing (calculate & compare), trends.
  • Compare to rival business and researched businesses

Task 2: SWOT Analysis

Strengths – (INTERNAL) – say what strengths means
Strengths about the case study business
Strengths about the case study business in comparison to the rival business
Strengths about the case study business in comparison to the researched businesses
Weaknesses – (INTERNAL) – say what weaknesses means
Weaknesses about the case study business
Weaknesses about the case study business in comparison to the rival business
Weaknesses about the case study business in comparison to the researched businesses
Opportunities – (EXTERNAL) – say what opportunities means
Opportunities for the case study business based on the info provided about it
Opportunities for the case study business in comparison to the rival business
Opportunities for the case study business in comparison to the researched businesses
Opportunities for the case study business in comparison to the researched  businesses
Threats – (EXTERNAL) – say what threats means
Threats to the case study business in comparison to the rival business
Threats to  the case study business in comparison to the researched businesses
Threats to the case study business in comparison to the researched  businesses

Task 3: Recommendations

*HOW NOT WHY* *make 9 different points* *3 points from CUSTOMER GROUPS, 3 from TRENDS IN THE INDUSTRY, 3 from NEEDS OF THE BUSINESS*

* NUMBER EACH POINT* !! 20 marks here, so lots of detail needed!! **Remember – don’t give reasons, just say how. The examiner must be in no doubt how something could be developed!! **USE SUB HEADINGS** !!REMEMBER THE 7 Ps OF MARKETING**

  • Customer Groups – Customer services & satisfaction? How can this be improved? Special offers – membership packages/discounts? Other options – cafe/parking/creche/family friendly?
  • Trends In The Industry – What trending activities are there? Catering for specific groups – pre/post natal; elderly, disabled, children? Marketing activity – use of social media? (Give e.gs)
  • Needs of the Business – How can the business develop its offering? Sustainability – save money/cut costs/change staffing structure? Staff training – H&S, DBS, NGB quals, cust service?

Task 4: Justifications

*WHY* **USE SUB HEADINGS** *match the numbered points from Recommendations* 

  • Customer Groups – say why you made your recommendations for this part – include info from rival business and at least TWO researched businesses
  • Trends In The Industry – say why you made your recommendations for this part – include info from rival business and at least TWO researched businesses
  • Needs of the Business – say why you made your recommendations for this part – include info from rival business and at least TWO researched businesses 

To download these featured resources click here

To learn more about teaching Unit 22 you might be interested in my online course.

To join the course click here.

.

BTEC Sport Unit 22: How do organisations in the sport and active leisure industry develop and market their businesses?

Featured

Activity 3 of the Unit 22 BTEC Sport (Investigating Business in Sport and the Active Leisure Industry) external assessment requires students to make recommendations about how the case study business could develop and market itself.

Pearson, the exam board for BTEC Sport, defines marketing as “the process that SAL businesses use to market their products to reach their customers and meet their needs and expectations.”

So how can we, as teachers, help our students with this?

We are going to look at traditional and digital marketing and ways in which businesses in the competitive marketplace of the sport and active leisure industry (SAL) might use different marketing approaches in order to enhance brand, product or service awareness.

The types of marketing strategies and tactics adopted depend upon the type, size, scope, age and intention of the business and its competition. This in turn would inform the different types of marketing strategies that are used. A sole trader, partnership, or small business such as a personal fitness trainer (e.g. 10 Years Younger) is unlikely to adopt the same approaches to their marketing campaign as a national or multinational organisation (e.g. David LLoyd’s). 

Businesses of all types and sizes need to consider the cost implications of marketing, whether their message will hit their target market, and how effective their message will be in terms of return on investment through increased sales, membership, customers, revenue, etc. 

Pearson, the exam board for BTEC Sport, defines marketing as “the process that SAL businesses use to market their products to reach their customers and meet their needs and expectations.”

What are some of the ways that SAL businesses might do that?

Traditional marketing versus digital marketing.

What is traditional marketing?

Traditional marketing includes promoting the SAL using television, radio and the printed press such as newspapers, magazines, posters and flyers. There are advantages and disadvantages to using these traditional marketing approaches. 

Marketing using television has the advantage of reaching an extremely large audience. National and local radio also has the advantage of having a potentially large audience and is less expensive than television. Featured articles in specialist newspapers and magazines are less expensive than television and radio and also have the potential of reaching a large readership. Posters in the local community have the advantage of being seen by a large number of the general public, and flyers, which are pamphlets posted directly into peoples’ houses, are relatively cheap and also provide a potentially large coverage of the business’s message.

One of the main disadvantages of using traditional marketing methods is expense. Advertising on television can be extremely expensive and is usually prohibitively so for small and medium sized businesses which are local or even national. Radio advertising can also be costly although not as expensive as advertising on TV. The disadvantage of articles in newspapers and magazines is that there is often a long lead time from creating the content to having it edited and then published, which means that businesses may miss out on ‘striking while the iron is hot’ and not responding quickly to trends in the industry and meeting customers’ needs and expectations.

Added to these disadvantages, traditional marketing is often unable to focus on the specific target market of the SAL with this more generalized approach. This means that the marketing approach may not be as effective in comparison to newer types of marketing. Although posters and flyers may have a wide reach, they also may not speak directly to the intended target audience or demographic, which again can lead to an ineffective marketing approach.

What is digital marketing?

Digital marketing includes marketing activity that takes place online, for example on a business’s website, on Facebook, YouTube, Instagram, Pinterest, Twitter, LinkedIn, TikTok, in blogs and by email.

What are the advantages of digital marketing over traditional marketing?

There is still a place for traditional marketing for some large national or multinational businesses, e.g. see David Lloyd’s TV ad here. However, digital marketing has two main benefits over traditional marketing.

  1. It allows the SAL business to reach its target market with a greater degree of accuracy. SAL businesses can position themselves according to the online behaviours of their demographic. For example, if a female personal fitness trainer who specialises in fitness classes for new mums wants to attract new clients, she could create content and have an online presence where new mums spend their time online, on Facebook or Instagram for example. If the SAL business has the email of current and potential clients, direct email marketing can be also extremely effective.
  1. As well as being cheap (sometimes free), it is relatively quick and easy for an SAL business to create content and publish to its target market. This means that information about promotions, sales, forthcoming and recent activities and events can be conveyed in ‘real time’ allowing businesses to respond to changing trends in the industry or perhaps even to become trend setters as well as acting quickly to meet the needs and expectations of their customers.

Is there a difference between content marketing and paid marketing in the digital space?

Paid marketing is where a business pays an organisation such as Facebook, LinkedIn, YouTube or Google to advertise their products or services in the online space. Whilst businesses may be better able to reach their specific target audience with paid advertising, there is still a cost implication here which may be prohibitive to many small, local businesses.

The alternative is content marketing, sometimes referred to as organic marketing.

Organic marketing is marketing which is free or costs very little money. It consists of content that businesses create themselves and which they publish in the digital space, for example blogs and articles on their website, posts on Twitter, Instagram and other social media platforms, videos uploaded on YouTube and podcasts on platforms such as Spotify, etc. 

One of the main purposes of organic marketing is not only to increase awareness of the business but also to increase awareness of its services or products through gaining exposure via growth online, (think retweets and readers liking and sharing posts, videos and blogs with their friends, family or colleagues). It can also be a very effective way to retain current customers and attract new ones.

Perhaps the biggest advantage of organic marketing is that, provided small and medium sized businesses have the time and know how to create and publish their content, satisfied customers do the work for them – talking about their positive experiences through the digital version of ‘word of mouth’, thus enhancing a business’s reputation and helping it to grow or perhaps even become the market leader.

Coupled with this, one of the best ways to promote a SAL business is through testimonials and social proof.

Testimonials and evidence of a strong track record, whether that might be excellent customer service or offering fabulous value for money, develops trust and confidence in the market place and with potential new customers.

This means that customers leave a starred rating and write a positive review about their experience. It is important for the SAL business to encourage customers to leave reviews if they have had a positive experience and would recommend the service to others. Testimonials and evidence of a strong track record, whether that might be excellent customer service or offering fabulous value for money, develops trust and confidence in the market place and with potential new customers.

Businesses could offer incentives for satisfied customers to leave positive reviews on social media by offering to put them into a prize draw or to have a discounted price the next time they use their service. 

What about market research?

Market research is also really important. This means that organisations obtain information from customers about specific areas of their business with tailored questions. This could be to find out the satisfaction of the current business provision or it could be to discover what customers would like to see improved or any new offerings that the business could make.

It is important to listen to the needs and expectations of the customer and to identify any frustrations and concerns they have about the business. Once businesses know about these, they can solve those issues, improve on them as well as introduce new ideas that customers have suggested. The importance of market research should not be underestimated.

In summary

  • There is still a place for traditional marketing for some SAL businesses. It can reach wide audiences, but can be expensive and does not always speak to the SAL’s target market.
  • Digital marketing has the potential to reach the SAL’s target market and demographic more effectively. It is less expensive, if not free.
  • Content or organic marketing is an effective way to increase awareness of the SAL business as well as its products and services. This is a good option for small and medium sized businesses.
  • Testimonials and social proof are among the very best ways for SAL organisations to promote and develop their businesses.
  • Market research allows the SAL business to meet the needs and expectations of the customer.

Feel free to download this article as a PDF to use in your teaching of marketing with your students.

It would be great to hear what you think of this post and how you use it for teaching. If you found it useful please leave a review – after all, one of the best ways of promotion is through testimonials and social proof! Thanks.

Do your students know how to tackle the external assessment? This might help!

OneNote ClassNotebook ‘How To’ Guide

Featured

Very happy to share this guide on using OneNote ClassNotebook which I created for colleagues. Please feel free to download and use in your setting.

How To Add a Section

Select the section in which you want the new section to appear. For example, if you want to add a new section to the Content Library, make sure the Content Library is selected. Click the purple Add Section text at the bottom of the Section pane. Name the section and click OK. The new section will appear.

How To Add A Page

Select the section you want the new page to appear in. In the Page pane, click Add Page at the bottom of the pane. The new, untitled page will appear.

How To Name a Page

Type in the name of your page at the top of the main canvas. The name of the page will appear in the pages pane.

How To Add Text to a Page

Click anywhere under the title to start typing on the page. Type away and edit as you would normally using the MS ribbon and tool bar. To reposition the text, hover your cursor over the top of the text box, using the crosshair icon drag the text box to your desired position.

How To Add an Image

Click on the page. Click the INSERT tab. Click PICTURE. Choose where you want to get your image from. Follow the onscreen instructions to get your image. Click INSERT. You can resize and reposition your picture on the page. Resize the picture by clicking on it. Drag handles will appear, use these to resize your image. You can move your image by hovering the mouse on the top of the image. The cursor will change to cross hairs, use these to drag the image to the desired position.

How To Add a Video from (YouTube, Flipgrid, Vimeo)

Find the video (on YouTube, Flipgrid) you want to put on the page. On YouTube, click the SHARE button. Copy the video URL address. Go back to OneNote, click the page and paste in the address. Press the RETURN key on your keyboard. Your video is right there in OneNote, ready to play! You can reposition it by following the steps above. (See Add an image).

How To Add Audio (using a PC – mic needed or laptop)

If you are using a PC, click on the Class Notebook page. CLICK the INSERT tab. Click the Audio icon. If you have a microphone connected to your PC you can start speaking straight away to add your audio / spoken feedback or instructions. Click the STOP icon when you have finished speaking.

How To Add Audio (using the iPad)

On the iPad, tap the INSERT tab and then tap the page to activate the icons. Tap the audio icon and start speaking straight to record your spoken feedback / instructions. Tap STOP RECORDING when you have finished speaking.

How To Add an Attachment

Click on the page. Click INSERT. Click FILE. Click INSERT AS ATTACHMENT. Follow the onscreen instructions to get your file. Click INSERT. Your file will appear as an icon (e.g., a Word icon) on the page. N.B. When a student clicks on the icon, the document will open in a new window.

How To Add a Printout

Click on the page. Click INSERT. Click FILE. Click INSERT FILE PRINTOUT. Follow the onscreen instructions to get your file. Click INSERT. Your document will appear in full on the page. Best practice is to save your documents as PDFs before inserting them as file printouts. Tip: This works well with PowerPoint decks, but you will lose any interactivity. They should be Set As Background so that students can annotate them. (See ‘How To Ensure Students Can Write On or Type Over Documents’ below).

How To Add a Link to a Website

Click on the page. Click INSERT. Click LINK. In the pop-up window, add the URL address of the website and give it a name in the display text box. Click INSERT. When students click on the link they will be directed to the website. N.B. The website will open a new window.

How To Add a Webpage (using Apple Pencil)

On your iPad ensure the Apple Pencil settings are set to LEFT CORNER SWIPE – SCREENSHOT – ON. Go to Settings – Apple Pencil to activate this setting. Navigate to the website you want to add to the OneNote page. Swipe your Apple Pencil from the bottom left-hand corner to the middle of the screen. Next, tap Full Page at the top of the screen. Now tap the export icon (the square with the arrow pointing out of the top). Drag the app icons across to find the OneNote icon. Tap on it and choose which Notebook and section you want to send the webpage to. Title the page and then tap send. At the desired location, touch and hold the icon and then tap Printout to see the entire webpage on the OneNote canvas.

How To Distribute Pages to Students

Make sure you are in / on the page you want to distribute to your students. Click on CLASS NOTEBOOK on the ribbon at the top of the Notebook. Click on DISTRIBUTE PAGE. To distribute a page to all your students, click on DISTRIBUTE PAGE from the drop-down menu. In the pane on the right-hand side, select the student section you want to distribute the page to. Click the purple DISTRIBUTE page. The page will then be distributed to all students and will be in the designated section in their Notebook. (NB. This may take a little while – be patient!).

To distribute a page to one student, follow the same procedure above, but select INDIVIDUAL DISTRIBUTION instead of DISTRIBUTE PAGE from the drop-down menu.

How To Create Subsections within Sections

To create a subsection in the section pane, click on Class Notebook then Distribute New Section, then click on Distribute New Section Group. Name the new section group in the box provided and then name the new section (sub section). You can add multiple new sections by clicking + Section. Then click DISTRIBUTE. The new section group and subsections are distributed to all students. N.B. The new section group is not added to the Content Library nor the Teacher Only section.

How To Change Students’ Names from Their School Code

This needs to be done in the desk top app, currently Windows 10. On your PC, type OneNote into the search bar in the bottom left-hand corner of the screen. Click on the OneNote icon to open it. Navigate to the Class Notebook you want to edit – you will see the name of the Notebook under the ribbon in the top left-hand side of the screen. Use the drop-down menu to locate the Notebook you want.

Along the top of the page, you will see tabs with your students’ school code. Hover your mouse over a tab and right click. You can now change the name of the tab to the student’s first name and last name, for example.

How To Mark Students’ Work (on the PC)

On the PC, click on Class Notebook, then click on Review Student Work. A pane will appear on the right-hand side of the screen. Select the section you want to navigate to, click Next then click the page where your students’ work is / should be. Click Next and the names of all your students will be shown. Click on the first student’s name at the top, this student’s page will automatically open and you can mark their work. When you are ready to move on to the next student’s work, just click the second student’s name on the list and their work will automatically appear.

You can insert voice /audio feedback (as above) as well as ink and highlight areas of the students’ work.

How To Mark Students’ Work (on the iPad)

On the iPad, tap on Class Notebook, then tap on the Review Student Work icon, which is the document with a blue tick in the bottom right-hand corner. Tap Review Student Work. A pane will appear on the right-hand side of the screen. Select the section you want to navigate to, click Next then click the page where your students’ work is / should be. Click Next and the names of all your students will be shown. Click on the first student’s name at the top, this student’s page will automatically open and you can mark their work. When you are ready to move on to the next student’s work, just click the second student’s name on the list and their work will automatically appear.

To mark students’ work, tap on the DRAW tab and use you Apple Pencil to digitally annotate and mark. You can add a voice note by tapping on INSERT, tapping on the page and then tapping the audio icon.

How To Change the Appearance of the Page

To change the page colour, click on View and then Page Colour. Select the desired page colour.

On the iPad, to change the paper style click View and then Paper Style. Select the desired paper style.

On the PC, to change the paper style you need to be on the desktop Windows OneNote app. Click View and then click Rule Lines. Select the desired paper style.

How To Use the Collaboration Space

The collaboration space is an area in which students can work together to complete tasks. You can use the collaboration space in a number of ways. You can set up a task which all students can access and contribute to, or you can create different tasks for groups for smaller numbers of students to access. To set up a whole class activity, simply create your task on a page in the collaboration space. There is no need to change any settings as all your students can access this page.

If you want to create different tasks for smaller groups of students, you can restrict student access to specific pages within the Collaboration space. To do this, you need to create the pages and activities in the Collaboration space first. Then, click on the Class Notebook tab, then click Manage Notebooks (a book icon). Then click the collaboration space permissions and assign your students to the specific page within Collaboration space that you want them to have access to. Only the assigned students can access the designated page.

How To Use the Content Library Section

The content library section is a place where you can put your documents which your students are able to see but they are not able to edit. This means that they are read only for the students. You can distribute pages to your students from the content library section and students can copy pages from the content library section and paste them in their own Class Notebook.

How To Use the Teacher Only Section

The Teacher Only section is a secret section that only the teacher can see, and this is where the teacher can store documents and materials which are not accessible to students. The teacher can distribute pages to students from the teacher only section when they wish to, or they can distribute them to the content library if they want to make them available to students as read only documents.

How To Ensure Students Can Write On or Type Over Documents

To ensure students can write on or type over documents that you have distributed to them the document needs to be pinned to the background. This is done on the iPad or the desktop Windows app.

On the iPad, touch and hold the document and several options will appear in a black bar at the top of the document. If it is not immediately visible, click the arrow to the right of the black bar and then tap on Set Picture As Background. This will now allow students to write on the document and to type over it.

Your students can also set picture to background on the iPads by following the same method.

In the Windows app, select the document and right click on the mouse. From the drop-down window select Set Picture As Background. If the document has more than one page or slide, you will need to repeat the process for each page or slide in the document.

6 Essential steps to teach classification of skill successfully

Featured

At first sight it might seem that classification of skill is a relatively straightforward topic to teach. And for the most part, you’d be right!

However, as I explain in this blog, there are a few essential steps required in order to ensure students fully understand this topic and are able to successfully tackle any exam question thrown their way.

null

Often this topic is one of the first to be taught on an AS or A level PE course and that is because its content is relatively straightforward to grasp and many students will have come across classification of skill of some kind if they have studied GCSE PE previously.

However, to ensure thorough subject knowledge for your students and to give them the best possible chance of performing well in exam questions there are a few pitfalls that need to be avoided and some skills which are often overlooked that need to be developed.

Follow these essential steps to teach classification of skill successfully:

#1.  Excellent subject knowledge – your subject knowledge. As with every topic, before you start teaching classification of skill you need to ensure your subject knowledge is tip top and that you know your way around every part of it so that you are confident in your ability to pass on this knowledge to your students and to ask them the right questions to see where the gaps in their knowledge lie.

With in-depth subject knowledge you also have an understanding and appreciation of the bigger picture of this topic and you can tailor your teaching accordingly. (Click to Tweet).

#2. Teach and test definitions and key terms – to ensure your students gain valuable marks in their exams. There’s a lot of information for your students to know in this topic and it is essential that their learning is structured. That’s why I recommend that you are very specific and logical with the way in which you teach the definitions of key terms and concepts such as a ‘movement skill’, ‘classification’ and ‘continuum’, as well as the meanings of each of the different types of skill classifications, (e.g. discrete skill and complex skill).

Exam questions on this topic do not often carry a high value i.e. they may be out of two or four marks only. Therefore it is important that your students are able to give specific, precise answers using the correct terminology to these types of questions rather than giving ‘woolly’ responses which will gain no credit (Click to Tweet) and will often be marked as ‘TV’, (which means too vague).

As well as teaching students the meaning of key concepts such as ‘externally-paced skill’, it is important that you instil in your students the importance of being able to give practical examples to each of these concepts from the very start of their learning, (see essential step #5 for more on this).

Tip: Worksheets with the key concept or terms in the left hand column and the definition or meaning in the right hand column are a simple but highly effective way of structuring learning for this topic. Test or quiz your students often on these key concepts and terms.

Ensure your students have plenty of practice in answering these exam style questions which are marked (according to the rigours of the mark scheme and the exam board) and that you give your students the feedback they need in order to improve and make progress.

Additionally, make use of some of the excellent online digital flashcard websites or apps that are available for free. I favour Quizlet and make use of all of its functionality with my students, but especially the test feature.

Click the link for free access to my PE Tutor class on Quizlet where you’ll get unlimited access to all of the flashcard sets I’ve ever created.

If you’d like to learn more about how to make effective use of Quizlet for teaching and learning, enrol on my free online course here.

#3. Teach the names of the continua (& what they mean) – to avoid potential pitfalls! It’s all well and good your students knowing the different types of skills e.g. gross and fine, open and closed, and self paced and externally paced, and what they mean, however there have been a number of times when students have come unstuck when they have been asked an exam question which has included the name of a continuum which they were not familiar with and as a result they were not able to access the question. OCR do this often!  

Take a look at this past paper question:

Movement skills can be classified in a number of ways. Explain what is meant by the continuity classification.

Students may well have a good understanding of what a discrete skill is, what a serial skill is and what a continuous skill is and they may well be able to give good practical examples of each of these. However, if they are not familiar with the term continuity continuum and they do not know what that means they would have difficulty in accessing this question and responding successful.

Therefore it is important (essential) that you teach the names of each of the continua to students and that they know which skill classifications correspond to each name. (Click to Tweet).

If you teach OCR A Level PE, here’s a reminder of the names of each of the continua:

  • the difficulty continuum (including simple & complex skills)
  • the environmental influence continuum (including open & closed skills)
  • the pacing continuum (including self-paced & externally paced skills)
  • the muscular involvement continuum (including gross & fine skills)
  • the continuity continuum (including discrete, serial & continuous skills)
  • the organisation continuum (including high organisation & low organisation skills)

#4. Justification – one of the key themes that I have seen running through examiners’ reports is that students tend to have a reasonably good understanding of the different types of skill classification but in their written responses in exams they tend to be less good at justifying the placement of these skills on any given continuum.

Therefore it is absolutely vital that you teach your students the importance of justifying the placement of each skill on a continuum. (Click to Tweet). Make sure that your students understand what ‘justification’ and ‘to justify’ means. (Click to Tweet).

This is a rather simple concept and forgive me for teaching you to suck eggs, but it is one which is often overlooked by teachers who assume their students know and understand what these words mean. However, experience tells me that this is not the case. So ensure that your students know what justification means and that they have plenty of practice in justifying and giving reasons for the placement of skills on a continuum.

Tip: A very useful and simple tip is to ensure that students use the word ‘because’ in every response they make to these kinds of questions. I know, it’s too obvious, but you’d be surprised how many students don’t do this!!

It is also important to make sure that students are aware of the way in which some questions are structured and that often the second part of a question on classification of skill is the area that focuses on the justification of the placement of the skill on a continuum. Far too often students either do not respond to this part of the question or fail to answer it correctly.

The importance of being able to justify should not be underestimated!  

#5. Practical examples – ensure that your students give practical examples all the time. I have written about the importance of exam technique and giving practical examples in another blog and this point cannot be overemphasised!!

Frequently remind your students that they are studying physical education and sport and as such they need to be able to provide practical examples from sport and physical activity in all instances. The quicker they get into the habit of doing this, the better! (Click to Tweet).

For example, usually it is not enough just to write about the theory of gross and fine skills (e.g. gross skills involve large muscle movements and fine skills involves small muscle movements) without giving a practical example to support their response.

Students need to be able to show the examiner that they can apply their theory to practical examples. For most exam boards this is AO2 (practical application) and students will lose relatively easy marks if they don’t / can’t give practical examples.

Tip: A very useful and simple tip is to ensure that students use the phrase ‘for example, or ‘e.g.’ in every response they make to these kinds of questions. I know, again, it’s too obvious, right? So obvious, that we often assume our students know to do this, without us explicitly telling them to do it. Don’t overlook this. Put an A3 piece of paper or large poster on the classroom wall that all of your students can see with ‘for example’ in large, bold letters on it and refer to it often in your teaching.

Additionally coach your students to write the name of the sport in which the skill is executed at the start of their response, for example, ‘In hockey, a hit would be a gross skill because large muscle groups such as the biceps, triceps and deltoids are used to execute this rapid, explosive action.’ But make sure students know that simply stating the name of a sport is not the same as giving an example of a given skill (Click to Tweet) and as such they would be unlikely to gain marks for this.

#6. Quiz – often! – the more we know about neuroscience and learning the more it is apparent that the more frequently we review and revisit concepts and topics, the more likelihood there is that we will remember them. If you are familiar with the concepts of interleaving and spaced retrieval you know this already.

Make use of online digital quiz applications, such as Socrative, to frequently give your students low stakes quizzes. (Click to Tweet).

Not only do the students enjoy doing these quizzes, sites such as Socrative provide valuable feedback for you to act upon (in real time, if necessary) to see where your students’ understanding is and how you need to adapt your teaching accordingly.

If you teach OCR A level PE, here’s the code to a ready made 25 question multiple choice and true / false quiz on classification of skills. If you teach another exam board, that’s not a problem, you can edit the quiz in Socrative to make it exam board specific.

Simply copy the code and paste it into Socrative.

SOC-34812977

Socrative is a great tool for responsive teaching! To learn more about how to use Socrative effectively, enrol on my free course here.

And if you’re already familiar with using this great resource, here’s a direct link to the Socrative website.

Recap: 6 Essential steps to teach classification of skill successfully

#1 ~ Excellent subject knowledge

#2 ~ Teach and test definitions and key terms (often)

#3 ~ Teach the names of the continua (& what they mean)

#4 ~ Justification

#5 ~ Practical examples

#6 ~ Quiz – often

I hope you find this post useful. I’d love to hear your feedback about it and your experiences of teaching this topic.

Let’s talk about it in the comments below.

Revolutionising PE Revision: The Interactive Digital Revision Notebook

As a PE teacher, naturally you want your GCSE students to succeed in their exams and perform to the very best of their ability. But with so many topics to cover, students can often feel overwhelmed and unsure of what to revise and how to organise their notes. This can lead to confusion and frustration, not only for the students but for teachers as well.

But what if I told you that there’s a solution that could help alleviate these pain points and revolutionise PE revision for both teachers and students alike?

Introducing the Interactive Digital Revision Notebook – a revolutionary tool designed to make PE revision easier, more organised and more effective. 

This cutting-edge revision tool offers a range of features that help students stay on top of their revision and to perform at their best in their PE exam.

Benefits for PE Teachers:

  • Save time and money by providing students with a pre-populated exam specific digital revision resource
  • Be 100% confident that your students are revising the correct content
  • Easy for you to use and integrate into your existing lesson plans and teaching

Benefits for PE Students:

  • Your students can stay organised and on top of their revision with easy-to-use note-taking features
  • They can prepare for their exams with confidence, knowing they have all the easily accessible information they need at their fingertips

The Interactive Digital Revision Notebook is the perfect solution for PE teachers who want to help their students succeed in their exams and perform to the best of their ability.

With its innovative features and intuitive design, it’s never been easier for students to stay on top of their revision and perform at their best.

Don’t wait any longer, revolutionise your PE revision today and give your students the tools they need to succeed in time for this summer’s exams.

To register your interest in buying the Interactive Digital Revision Notebook at an introductory price, (50% discount) contact me via email at petutor.thinkific@gmail.com.

Five Ways To Develop Teachers’ Digital Competencies

My role of Director of Educational Technology at a large independent school in the south west of England is varied, incredibly busy and hugely fulfilling. Supporting the ongoing learning and development of over 150 colleagues in their use of educational technology and fostering the effective use of digital skills by the 1300 plus students at the school is not without its challenges, but it is also immensely rewarding. 

My recent completion of the CIPD (Chartered Institute of Personnel & Development) Level 5 Diploma in Learning and Development has assisted me enormously in recognising, pre-empting and overcoming some of those challenges and helped with the provision of professional learning opportunities for my colleagues. 

Here are five ways in which I support my colleagues in developing their digital competencies for teaching and learning.

  1. One To One Training

I make myself available to all colleagues for one-to-one training sessions either in their classrooms or in my dedicated training office (equipped with a large screen to demonstrate the use of software and apps on the PC and / or on the iPad). Often these sessions are one time occurrences in which teachers benefit from confirmation or reassurance about how to use software in a particular way for teaching and learning. I have found that these sessions are often about overcoming one particular barrier which then enables colleagues to make maximum benefit of the particular software that they are using.

The other type of one-to-one contact involves sessions over a period of time in which I adopt a coaching role and support colleagues by asking them questions to assist them in finding solutions to problems themselves and innovative ways of using applications. This is very effective as it encourages teacher autonomy and builds confidence.

In both of these one-to-one scenarios I have progressed to being present with the teacher in their classroom during their lessons. By doing so I have been able to oversee the smooth implementation of the technology in the lesson while the teacher can continue focusing on teaching and learning. Recently I was present in a drama lesson in which the teacher made excellent use of Flipgrid. I was there in a supporting role to ensure that anything on the technical side could be overcome without interrupting the flow of the lesson and learning. 

Similarly, following one-to-one training with a teacher of Spanish I was present in the classroom with him when he introduced Flipgrid. I was able to support students on a one-to-one basis with setting up the app and showing them how to operate it successfully. This led to the smooth running of the lesson and some excellent digital content creation by the students. 

  1. One To Some Training

In one-to-some training scenarios I work with small groups of colleagues in workshops where I encourage collaborative learning so that teachers can learn and find out together, and support one another with the development of their digital competencies. Recently I have worked with teachers new to the school, ECTs and PGCE students who had not worked with Apple Classroom or the Microsoft suite of apps before. 

  1. One To Many Training

One-to-many training refers to offering training and support to a large number of people in a group, for example a whole subject department or faculty. In these situations I am able to tailor the training to the specific needs of the department. This is a two-way process which involves communication and liaison with the head of department initially in which conversations will establish what the needs of the department are and with colleagues within the department to recognise and understand their individual and group needs. From that needs analysis, I create bespoke training specifically for each department. Recently this has included working with the history department to create quizzes using Microsoft Forms for retrieval practice and the Music department creating quizzes whilst listening to pieces of music using Microsoft Forms and Edpuzzle, working with the English department looking at how to make effective use of OneNote and the Physical Education department and how best to utilise the affordances of Flipgrid in student coursework activities. 

CPD Sessions

Educational technology and digital learning falls in the teaching and learning category of our whole school CPD offering. In these sessions I offer training to colleagues across departments who are particularly interested in developing their competencies in using software and how it can be successfully integrated into their pedagogy to support effective teaching and learning. 

The key to success in this area is to offer teachers a choice of different digital learning options so that the focus of the sessions offered are not ‘top down’ (i.e. we are only doing a CPD session on something that I have decided to do, or worse still because I want to!) but are sessions which have been chosen by the teachers from a range of different options. This serves to improve motivation and attendance, as adults are more likely to attend if they want to be there and have an interest in the topic.

Furthermore, successful professional learning and the development of teachers’ digital competencies lies in providing a sustainable programme overtime which enables teachers to learn about the software initially in a safe and non-judgmental environment, (that’s the training session with me and fellow colleagues) and then to be able to gradually implement the use of the software in their teaching and learning context. They should then be given the opportunity to meet with colleagues at a later date (perhaps four or five weeks later) to discuss and reflect on the use of the software (from both a teacher’s and students’ perspective) and share the successes and failures that they have encountered. It is so important to go beyond just a one-hour CPD session and assume that teachers will be fully equipped with the wherewithal to successfully run with new software in their teaching.

  1. On Demand Learning

The pandemic obviously had an enormous influence on the way in which teachers use digital technology for teaching and learning and one of the offshoots of the pandemic was the way in which I provided on demand learning to colleagues. At the onset of the pandemic I created a number of video tutorials on how to use Microsoft Teams and OneNote which were extremely well received and which served to support colleagues at the start of and during the pandemic. Now that we are back ‘in-situ’ the development of on-demand learning content has continued with the creation of an increasing number of video tutorials about a variety of different applications that could be used for teaching and learning. 

As teachers have become more aware of the videos and have turned to them frequently, the idea of ‘just-in-time learning’ and ‘learning at the point of need’ has become more prevalent, leading to teachers being more confident and secure in their use of educational technology. 

I created a page in SharePoint called the EdTech Learning Hub which houses several pages about using Microsoft applications, such as Teams, OneNote, Forms, Flipgrid and PowerPoint. In addition to this, I create a short video most Fridays which is published in our staff bulletin. These Edtech Friday tips provide quick snippets of information and updates of developments in digital learning which teachers are able to quickly and easily implement into their practice. 

Beyond that, also housed in the Edtech Learning Hub is a podcast which is called Teachers’ Stories and which involves colleagues discussing the way in which they have successfully used applications in their teaching and learning. This empowers teachers as it provides a platform for them to both share and learn. Topics have included how OneNote can be used to provide oral feedback to students, the use of quizzing apps such as Socrative and Quizlet for retrieval practice and spaced learning and how Forms has been employed to foster flipped learning.

  1. Social & Collaborative Learning

It is also important to provide a forum for colleagues to exchange experiences and to support one another in their use of educational technology. With this in mind we set up a specific Team in Microsoft Teams called Edtech Mutual Support in which colleagues could post anything that they wanted to with regards to educational technology and digital learning. This included articles or points of interest they had become aware of and questions which other colleagues were able to answer. Thus a whole staff peer support mechanism was in place. This has proved to be enormously successful and popular and it has helped to develop a culture of peer learning. Although I and colleagues in our IT Services department do receive specific questions via the chat or post channels, I did not see myself as the guru who has all the answers but simply another contributor who is able to learn with and from other colleagues in this context. 

How To Develop a Feedback Cycle with Forms and OneNote

Have you felt frustrated when your students don’t take the time to read and respond to your feedback? Yep, me too!

In this quick post, with an accompanying video, I explain how you can develop a feedback cycle using both MS Forms and OneNote to overcome this problem.

As much of my teaching and assessment is now digital I make use of OneNote all the time. In fact, apart from Yr 11 mock exams, I think I marked one piece of work on paper last term and that was a formal assessment!

“To ease the marking load further I frequently use MS Forms for quizzes, low stakes assessments and for retrieval practice. “

Everything else is marked digitally, with my students either handwriting their work on paper and then taking an image of it and inserting it into OneNote, writing directly on to their iPads or tablets with the amazing digital inking features in OneNote, or by typing their responses. An increasing number of my students also use the dictation function as well.

To ease the marking load further I frequently use MS Forms for quizzes, low stakes assessments and for retrieval practice.

However, one of the things I found irritating was that after students had taken their quiz in MS Forms and I had marked it, they rarely returned to the original quiz to view my feedback and to act upon it.

Whilst there is a way to see their feedback by returning to the quiz via clicking on the link students were originally given, I found that this is not something that students did of their own volition, or even know about. Therefore I had to find a way in which I could ensure that the time that I had taken to give feedback to my students was not wasted and equally that learning opportunities for the students were not lost. Enter OneNote!

How to return a marked quiz to students in OneNote?

Having finished marking and providing feedback for your students in a quiz you then print the quiz to OneNote on the desktop app. You select the appropriate section and student’s name in the relevant Class Notebook and print the quiz to this location. (See the video below to learn exactly how to do this).

My classes have a section called Retrieval Practice in their Class Notebook which is where I print their quizzes. After they have taken a quiz, they know to access this section, to read my feedback and then respond to it, either by typing, writing (digital inking) or by inserting a voice note. I can then easily access their responses, either during the lesson or at a time which is convenient to me, to see or listen to how they have responded to my feedback.

With this method, you are able to identify whole class and individual misconceptions and gaps in knowledge and reteach these points, if necessary. You can then build those topics into future retrieval practice quizzes in MS Forms. In this way, you develop a feedback cycle which assists students on their learning journey.

If you’d like to find out more about how to use MS Forms for teaching, learning and assessment you might find this useful.

As always, I’be be grateful for your comments and thoughts about this article. Thanks.

Master Microsoft Forms for Teaching, Learning & Assessment: Online Course

With the ever increasing growth of digital learning in schools, colleges and universities I have created a course to assist teachers and educators to get the very best out of Microsoft Forms. 

The aim is to enable teachers and educators to become so familiar with MS Forms that it transforms teaching, develops students’ learning, and assists with student assessment. All with the overall aim of supporting students to achieve their absolute best.

I wanted to spend a little time here letting you know about my online course entitled Master Microsoft Forms for Teaching, Learning and Assessment. 

Unlike other books or guides which look mainly at the functionality of MS Forms the course takes a deep dive, approaching the use of MS Forms through the eyes of the educator, promoting understanding of the student’s perspective, as well as what quizzes look like ‘behind the scenes’, how to mark and grade quizzes and how to provide feedback to students before posting them their results.

Here’s what you’ll learn on the course:

  • How to create, edit, copy & distribute quizzes to students & colleagues
  • How to create many different kinds of questions, including Maths, Ranking & Likert Scale questions
  • How to copy, delete, shuffle & move questions
  • How to give an extra dimension to your questions by adding images & videos
  • How to use the amazing Immersive Reader
  • How to use branching to support student learning
  • How to create & view File Upload questions
  • How to manage settings, give feedback & print quizzes
  • How to manually mark quizzes & access summaries of students’ responses
  • How to promote meta-cognition, retrieval practice & spaced learning

There’s a ton of extra stuff too!

When you enrol on the course, you’ll get access to a 60+ page e-book which includes all the written key takeaways that you’ll see in each tutorial. As well as watching and listening to the tutorials, you can refer to this easy to follow e-book to help you master MS Forms for Teaching, Learning and Assessment.

You’ll also get downloadable practice activities from the course which will enable you to practise on the go and will help you master MS Forms for Teaching, Learning and Assessment.

Learn how you can generate QR codes of MS Forms to provide differentiated learning activities for your students. There are also some further useful tips and ideas on how to devise retrieval practice & spaced learning activities. Plus downloadable links to free pre-created quiz templates!

I hope you find the course useful. I’d love to hear your feedback.

Remote Teaching using Break Out Rooms in Microsoft Teams

Much has been written about remote teaching and learning recently with a considerable focus on the features and functions of online teaching platforms, such as Microsoft Teams.

Using Break Out Rooms in Teams

In this blog I want to go further than simply explaining what these features and functions do and look at one way in which we can put these capabilities together so that we can involve and include all our students in a lesson. Let’s look at break out rooms for remote teaching and the potential they have to offer.


A break out room is a separate channel within your Team that you can direct your students to (either in small groups or individually), where they can work on their own, or collaborate on different tasks with classmates and where the teacher can communicate with the students.”


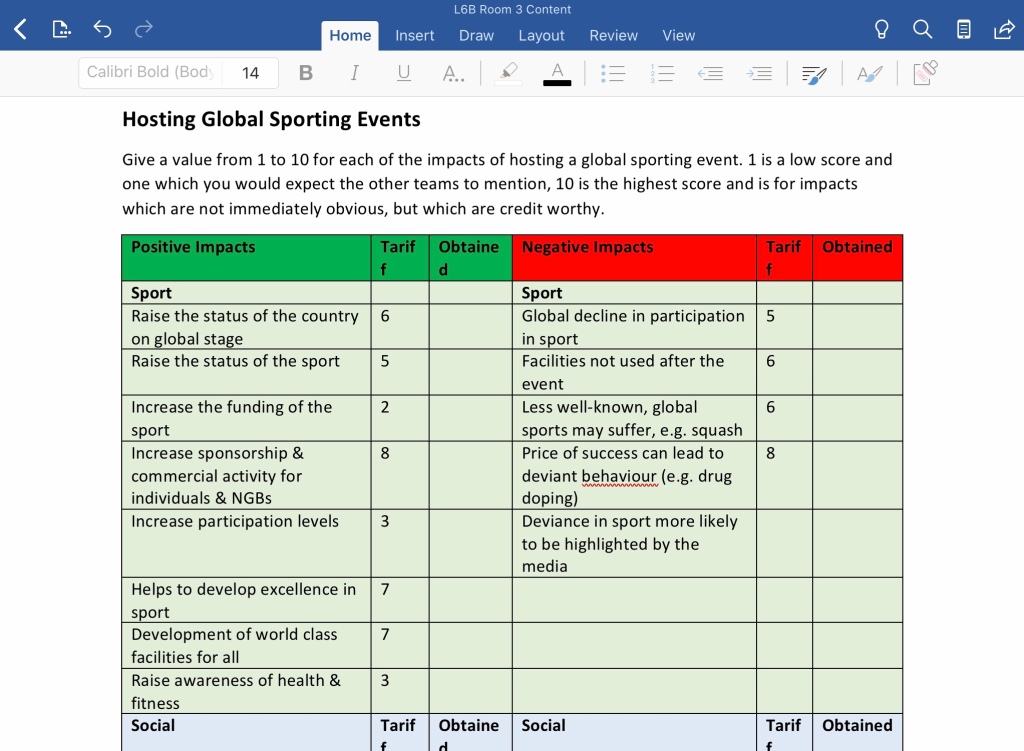
We’re going to look at a lesson I created recently about the impact of hosting global sporting events (OCR A Level), but this method could be used for any topic that lends itself to discussion and debate.

The topic you are teaching and number of students you have in your class will determine the number of break out rooms you will need. In this example I had 11 students and I structured the lesson so that I could divide the class into two groups of four students, and one group of three. Each group had a different task to do in their break out room.

The first group of students were assigned to Room 1 and their task was to prepare for a debate in which they would be arguing in favour of hosting the Olympic & Paralympic Games in Birmingham, in the UK. The had to include as many positive impacts on sport, on society, on the economy and politically as they could think of.

The second group, assigned to Room 2, had a similar task, except their focus was to argue against hosting the Olympics & Paralympic Games in Birmingham. Similarly, they had to include as many negative impacts on sport, on society, on the economy and politically as they could think of.

Arguing for and against hosting the Olympic and Paralympic Games

The third group, in Room 3, were the judges. They were assigned a different task. The students in this group were given a document with the positive and negative impacts of hosting such a global sporting event, (a mark scheme, if you like).

Their task was to assign a points value for each of the impacts they had been provided with. A low score (1 or 2 points) would be given to an impact which they believed was very obvious and which they would expect both of the other teams to produce. A higher scoring tariff (7, 8, 9, or 10) would be allocated to an impact which they felt would be less obvious, but nonetheless creditworthy.

The judges created a points tariff for the impacts of hosting the Olympic & Paralympic Games

After I had explained the task to the whole class, each student then went to their own breakout room and started to work together with their fellow classmates. In each breakout room I explained in the post / conversation exactly what their task was and the roles that the students in that room were expected to fulfil. They could work collaboratively on a Word document to articulate their thoughts about either positive or negative impacts.


Before the start of the lesson, I had already started a meeting in each break out room. This meant that the students could come out of the whole class meeting and enter their breakout room meeting to talk to the other students in their group without anyone else in the class being able to hear them.

As the teacher, I was able to go into each break out room and listen to the students discussing their ideas and to support and guide them, where necessary. When I wasn’t visiting each room, I waited in the main lesson meeting so that students could come and find me if they needed me. If I wasn’t there because I was visiting a breakout room, I told them to leave a message for me in the chat and I would then go and visit them in their room.

Students allocated to their break out room – a private channel in Teams

Retrieval Practice with Flipgrid

Retrieval Practice with Flipgrid

I recently bought the excellent book by Kate Jones called Retrieval Practice. This book is really accessible and is packed with great ideas about how to promote retrieval practice in your classroom. If you have not yet picked up a copy of this book, I highly recommend it and as an added bonus, it is very affordable.

Reading through Kate’s book got me thinking about how I could support my students through technology with their retrieval practice and I came up with the idea of linking a retrieval practice task with Flipgrid which would enable my students to access model answers after they had attempted to answer the question for themselves.

As Kate says in her book, the key concept of retrieval practice is about getting information out of the students. It is the process of trying hard to remember which ultimately aids the students. And so it is important that students are not given the opportunity to access the answers before they have attempted the questions. It’s also really important that the students grapple with the questions and try hard to retrieve the information required without using any notes or any material that will assist them.

So this is what I did.

Firstly, I made a retrieval practice exercise which included a set of 12 questions based upon content and material that we had recently studied. I created the document below using PowerPoint. The QR codes that you can see in the image came later.

Next I had to create the QR codes and this is where Flipgrid comes in.

I hopped over to my account in Flipgrid and created a number of topics as you can see from the image below.

In each topic I recorded a video which explained the model answer to each of the retrieval practice questions.

But instead of the students seeing my face and me explaining the model answer, I decided that I would put the question onto the video screen so that the students were able to see the question whilst they were hearing the model answer.

I thought this was a good idea because it enables the students to see the question and hear how I was often referring back to the question when providing the answer. This way I was not only providing an answer, I was also modelling how to construct the answer based upon what the question was asking of me.

Using the snip tool in Windows 10, I snipped an image of each of the questions from the PowerPoint slide and saved them.

Then, after I had recorded my video on Flipgrid, I used the ‘Add Custom Sticker’ function to put the question onto the video screen, as in the images below. I then made the rest of the background white by using the whiteboard function.

Once I had made the video and entered the white background with the question on the screen as a sticker, I then followed the usual procedure in Flipgrid and created my video.

Then I downloaded the QR code that is automatically generated by Flipgrid and I cropped it a little bit, before saving it as an image.

Next, I then inserted each of the QR codes onto the slide, resized them, placed them in the corresponding position with the relevant question, aligned them using the alignment tool and that was job done!

I printed the PowerPoint slide out a number of times to use in my lesson and I also inserted a PDF version into OneNote and distributed the page to my students, which means that they can now access this retrieval practice exercise whenever they want to.

Public Schools – The promotion and organisation of sports and games 

In this blog we take a look at the promotion and organisation of sports and games in 19th century Public Schools.

Below is an extract of an audio tutorial taken from my online course – Teaching A Level PE – Influence of Public Schools on Sports and Games. 


public school 1“Here we are looking at the promotion and organisations sports and games in the public schools and it is important that we make sure the students are aware that we are talking about what was going on in the public schools themselves. So this isn’t about what was happening in society, this was what was happening internally within these public schools, post 1850.

A key point to establish before you start teaching this area and to avoid potential pitfalls that I have fallen into in the past, is the assumption that your students understand what we mean by public schools. So it’s a good idea of course it take the time to make sure that they do understand.

Often students will know of Eton and Harrow and it’s useful for them to do some background research on one or two famous schools, such as Charterhouse, Shrewsbury, Winchester, etc. 

So, let’s look at the characteristics of what was going on in the public schools which promoted the organisation of sports and games in schools.

Space

The first thing we need to be thinking about is that the schools had space and they had facilities. I draw your attention to the word specialist and that is because the exam board in the past has been very picky about this point and will not accept just facilities or just space on its own. In this case, facilities and space on its own is not acceptable, therefore we need to make sure we teach our students to use the qualifier ‘specialist’ or ‘high quality’ before facilities. 

We then have to ask the question ‘so what’? If students just identify characteristics on their own they are unlikely to obtain marks (depending on the question asked). So we need to coach and train our students to answer that question and that, for me, is with the linking phrase ‘which meant that’. So for example, if students identify specialist facilities and space they would then have to develop that with which meant that ….. the boys had the opportunities to participate in sports which lead to skill levels rising and the growth of the cult of athleticism.

Specialist coaches

The next point is that the schools had specialist coaches. And again, students would need to develop this point by saying that this meant that this enabled the boys to become proficient at sport, which also promoted the growth of the cult of athleticism. 

Character Development

The games themselves promoted the idea of character development. Here, we’re talking about values such as honesty, integrity and courage, leadership, teamwork, for example. All of these values which the public schools at the time espoused as being great attributes of a Victorian gentleman. 

Time

The boys had plenty of time to play sport and in most of these schools during this era games was compulsory. This meant that the boys probably played five or six afternoons a week. This would have lead to the growing popularity of sport and reflected and developed the cult of athleticism.

House matches and School matches

The boys played house matches within the schools and they played fixtures against other schools. Both of these points reflect the growth and popularity of sport and the start of how competitions were set up. 

6th Form Role Models

The games were organised and promoted very heavily by the sixth formers who acted as role models to the younger boys. This point links back to character development and meant that the senior boys were developing organisational and administrative skills, which would be used later when, as ex-public school boys, they codified the games and established national governing bodies of sports.”

Public Schools - Organisation of Games

‘If students just identify characteristics on their own they are unlikely to obtain marks’

To find out more about the promotion and organisation of sports and games and to develop your teaching on all areas of the 19th century public schools, including the promotion of ethics and the cult of athleticism, head over to my online course here:

Teaching A Level PE – Influence of Public Schools on Sports and Games.